The CSA Food Project

The CSA Food Project

Monday, June 29, 2009

One Great Spice Blend

There is a lot that can be said for Emril Lagasse from his famous "bam" to making cooking a fun televised event. But what is often overlooked, if you have not had the opportunity to eat in his establishments, is that he is an amazing chef and restaurateur.

The recipe below is for Emril's famous Essence Spice Blend that he is always talking about. It is available commercially or you can make it from scratch as outlined below. The best part is that the recipe calls for highly common ingredients...that I am sure most will have at home.

Outside of my own personal blends, I have to say that this might be the best universal spice mix for everything from - grilled veggies, grilled chicken, grilled fish, potatoes (roasted, grilled, salad), rice/pasta dishes, eggs, pizza and beyond.

For the purposes of this article, I want to focus on grilled veggies. Simply placed cut veggies in a large zip lock add oil and essence blend and grill - toss bag with ingredients to coat. The spice blend grills wonderfully with carrots, zucchini, squash, potato, onion and more.

Ingredients:

2 1/2 tbsp paprika
2 tbsp salt
2 tbsp garlic powder
1 tbsp black pepper
1 tbsp onion powder
1 tbsp cayenne pepper
1 tbsp dried oregano
1 tbsp dried thyme

Process:

Combine all ingredients thoroughly.

Store in cool, dry place.

Best to use within three months of making.

July 4th Recipes - What Ya Cooking????


Its time for us all to reach into our inner pyromaniac and celebrate the joy of fireworks, barbecue and the birth of our great nation.

According to the long range forecast, looks like we are in for one awesome July 4th (as of this moment).

Reaching out to everyone in the CSA to share their best July 4th recipes. Let's see what we got out there!

CSA Share Details- Week #7

Here is the line up for tonights boxes:
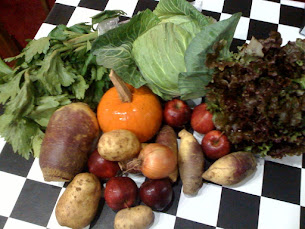
Beets w/ tops, carrots, herb, garlic scapes, kohlrabi, lettuce, salad, zucchini, fresh new potatoes, rhubarb ( the last til next year )

From the farmer: "This morning I noticed a lot of flowering on the eggplants – so we should have eggplants soon. We had a nice hot dry weekend – still working in the weeds that the rain brought in – any volunteers are welcome."

Tuesday, June 23, 2009

Sun Dried Tomato Vinaigrette

Not to get off on a rant but I am pretty much at the point of boycotting out of season tomatoes.

Knowing what a ripe, in season, locally grown tomato tastes like... I find it very hard to accept anything less. So for the better part of the year, I am looking for alternatives to the hard, mealy opaque things that they call tomatoes in the grocery store.

Sun dried tomatoes offer an alternative with their rich flavor. OK... not a perfect fit but a functional fir. Sun dried tomatoes, fresh mozzarella and basil are just not the same as the real deal. None the less, these little tomato "leathers" are versatile, packed with rich flavor, nutritionally beneficial and have an amazing shelf life.

With all the leafy greens that have been coming with the CSA, I thought that I would offer up this recipe as an alternative to the tomato dilemma I have shared with you.

In addition to salad greens, this recipe is excellent on pasta salads and even a replacement for canned tomato sauce. The vinaigrette can be served at room temperature or warmed - your choice. It will store for up to one week in the refrigerator in an air tight container making it available for multiple uses during the week.

Note: Not to contradict myself, this recipe does call for "fresh" tomatoes. For the purposes of the recipe, they are being used for liquid and texture and less for flavor.

Ingredients:

12 fresh basil leaves
8 sun dried tomatoes
2 tomatoes
2 cloves of garlic
2 tbsp olive oil
salt and pepper to taste
hot water - soaking liquid

Process:

1) Rehydrate the sun dried tomatoes in hot water for 20-30 minutes until soft

2) Seed and chop the tomato into rough cuts

3) Remove basil leaves from stems

4) When sun dried tomatoes are soft, remove - save the soaking liquid

5) Combine all ingredients in blender or food processor plus 6 tbsp of soaking liquid

6) Puree and adjust for taste. If the vinaigrette is too thick for your liking add additional soaking liquid with a little olive oil and mix to desired texture

The Garlic Scape "Top 10"

So what is this Garlic Scape stuff?

Well we all know the garlic bulb, but not as many are aware that the stalk of the garlic plant is also edible. Garlic scape is essentially the stalk of the garlic plant that also contains rich flavor and is a great ingredient for cooking.

Below are 10 quick ideas for ways to use this lesser known part of the garlic plant:

1. In its raw form, it can be made into garlic scape pesto
2. Grill or broil it with some good salt and olive oil
3. Add to eggs, omelets or a frittata
4. Sauté in butter or stir fry
5. Finely chop and add to bread and pizza dough
6. Excellent compliment to mashed or roasted potatoes
7. Pickle them
8. Add to leafy green or pasta salads as a secret ingredient
9. Use to make a "garlic" based dip
10. Make into a puree or soup

Just some ideas to help get the culinary juices flowing. I am more than happy to expand on any of these ideas if you like - just ask!

Monday, June 22, 2009

CSA- Share Details: Week #6

Note from the Farmer:
"PLEASE UNDERSTAND THE WEATHER HAS BEEN HORRENDOUS THIS YEAR – IT IS EVERYTHING THAT WE CAN DO TO PICK, WASH ,WEIGH & PACK YOUR BOXES ON TIME – WE WERE PICKING CHERRIES THIS MORNING AS WE WERE PUTTING THE BOXES ON THE TRUCK– IT HAS NOT BEEN PHYSICALLY POSSIBLE TO MAKE A LIST.

YOUR PATIENCE , COOPERATION & UNDERSTANDING ON THIS PROBLEM IS APPRECIATED AS WE GET BACK TO A REGULAR HARVEST SCHEDULE WE WILL BE HAPPY TO PROVIDE YOU WITH THE INFORMATION – AS WE HAVE IT.

WE ARE HOPING WE DO NOT HAVE ANY MORE TORNADOES, HAIL OR WRETCHED POURING RAINS OR HIGH WINDS. EACH YEAR HAS ITS CHALLENGES – THIS ONE HAS BEEN A WHOPPER."

**THE CHERRIES ARE COMPROMISED – PLEASE WASH & EAT THEM RIGHT AWAY THEY WILL NOT HOLD IN THE FRIDGE


romain lettuce, garlic scapes, cherries, potato, salad mix, beets, oregano, snow peas, kale

Friday, June 19, 2009

Asian Napa Cabbage and Chicken Salad

This might be one of my favorite recipes for fresh Napa cabbage. It is a wonderful alternative to your leafy green salad. I usually make this when I am looking for the salad to be the meal.

The recipe is very easy to prepare. There are two stages to this recipe - dressing and salad prep. If you are pressed for time, you can make the dressing up to a day in advanced.

I should caution you that the dressing does have some kick with the garlic, ginger and chili paste. If you want to neuter the heat, I would suggest adding less of the chili-garlic sauce at first and increase the amount to a preferred heat level. Remember that it will take on additional heat, as the flavors meld together with time.

While I prefer to use stock for this recipe, as noted below the poaching liquid for the chicken or broth can be used as substitutes.

When serving this for guests, I do like to plate in a large shallow serving plate and will use a combination of both black and white toasted sesame seeds. I also garnish with additional thinly sliced scallion greens for color. Black sesame seeds are available at your local Asian grocer.

Ingredients:

Dressing

3/4 cups reduced-sodium chicken broth/stock *
1/4 cups reduced-sodium soy sauce
2 cloves garlic - minced
3 tbsp olive oil
3 tbsp rice-wine vinegar
1 1/2 tbsp brown sugar or brown sugar substitute (Splenda)
1 tbsp fresh ginger - minced
1 tbsp tahini paste
1 1/2 tsp sesame oil
1 1/2 tsp chile-garlic sauce

Salad

8 cups shredded Napa cabbage
3 1/2 cups shredded poached chicken (cooked)**
5 radishes, sliced
1 1/2 cups grated carrots
1/2 cups chopped scallions
2 tbsp sesame seeds

Process:

Dressing

1) In a small container add soy sauce, vinegar, brown sugar, sesame oil and chile-garlic sauce and stir to blend

2) Add oil to small saucepan over medium-high heat

3) When oil is hot add garlic and ginger and cook until fragrant (about 1 to 2 mins) - stir constantly

4) When fragrant, add soy sauce mixture to the pan and bring to simmer

5) Carefully whisk into saucepan, broth and tahini

6) Cook until slightly reduced (about 3 to 5 mins)

7) Remove dressing from heat and allow to cool

Salad

1) Toast sesame seeds in a dry skillet on medium heat until golden brown and aromatic (about 2-3 mins)

2) Remove sesame seeds from heat and allow to cool

3) In a large serving bowl, combine carrots, cabbage, chicken, radishes and scallions

4) Stir dressing to recombine and drizzle over salad - toss to coat

5) Top with sesame seeds and serve


* The poaching liquid from the chicken can be used in substitute for the chicken broth ** Should be around 1 1/2 pounds of chicken breast - boneless and skinless

Thursday, June 18, 2009

Peas and Potatoes - Two Recipe Thoughts

It brought me great pleasure to see peas and new potatoes in our CSA share this week.

As soon as saw them, I immediately thought of how nicely the fresh peas and potatoes complement each other in recipes. The fresh duo of peas and potatoes just screams springtime to me.

No doubt, you could most likely eat all the peas in one sitting as a snack as they are so delicious. If you can resist the urge of eating all the peas, below are two side dish recipes that I would highly recommend. As you will notice both recipes really leverage familiar seasonal ingredients.

Both recipes will yield about eight servings but can be scaled nicely either way for your needs.

Fresh Pea and New Potato Medley

Ingredients:

  • 1 lb new potatoes - cleaned
  • 2 cups fresh peas - whole
  • 2 tbsp fresh mint - chopped
  • 2 tsp butter
  • 1 tsp salt (sea or kosher)
  • 1/2 tsp fresh ground black pepper
Process:
  1. In a small to medium sauce pan add salt, potatoes and enough water to cover
  2. Bring potatoes to boil and cook until knife tender (about 5 to 7 mins)
  3. Add whole peas and cook until crisp ( 2 to 4 mins)
  4. Drain in a colander and return potatoes and peas to pot
  5. Add pepper, mint and butter heating gently (60 to 90 seconds) tossing gently to coat
  6. Adjust to taste with additional salt and pepper as needed

New Potato and Snap Pea Salad

Ingredients:
  • 1 bunch scallions - white parts only, finely chopped
  • 2 lbs new potatoes
  • 2 cups shelled fresh peas (or frozen peas that are thawed)
  • 1 1/2 cups of radish - thinly sliced
  • 1/4 cup water
  • 2 tbsp fresh parsley
  • 1 tbsp butter
  • 2 tsp olive oil
  • 1/2 tsp salt (sea or kosher)
  • 1/4 tsp fresh ground pepper
Process:
  1. Clean scallions, retain white parts only - finely chop
  2. If using fresh peas - shell the peas
  3. Scrub clean potatoes - if they are larger than "golf ball" size - cut in half
  4. In a large pot add a metal or heat resistant steamer basket
  5. Add enough water to the pot (just below the bottom of the steam basket) and bring to boil
  6. Place potatoes into steamer basket and cook until just tender (about 15 to 20 mins) - potatoes should be cooked but still firm not mushy
  7. When potatoes are done - remove from heat and set aside
  8. In a large non-stick pan, heat oil over medium heat (while potatoes are cooking)
  9. When oil is hot, add scallions and cook until translucent (about 2 to 3 mins)
  10. Add in peas and water to scallions and cook until peas are just softened (about 3 to 4 mins)
  11. Proceed to add radishes and butter to pan, stirring until radishes are softened (2 to 4 mins)
  12. When radishes are cooked, add in parsley, pepper and salt and mix.
  13. Lastly, gently incorporate the potatoes into the pan - carefully as to not mashing or breaking up the potatoes
  14. Final adjust for taste and serve immediately warm

Wednesday, June 17, 2009

Grilled Potatoes


I tend to believe that potatoes are one of the best vegetables for grilling. It is a highly versatile veggie that can be cooked many different ways and is very forgiving to the cook.

While other veggies require high degrees of "grilling attention", as long as you don't directly burn the potatoes... you are good to go. For the purposes of this article, I am going to share my gold standard, never-fail approach to the perfect grilled potato.

First and most important ingredient...the potato. There are many different types but for grilling you want what are called "new potatoes." These are the smaller and lower in starch varieties such as fingerlings, red skinned, and purple Peruvians. I generally aim to purchase potatoes that are all around the size of golf balls. Basically something that is no more than two bites to finish. The pre-packed mixes of mini potatoes work perfect.

The technique is very easy. Scrub and clean the potatoes. After they are clean, place them in a zip lock bag adding enough olive oil, salt and pepper to coat.

Get the grill nice and hot - around 500 degrees. Place the potatoes on the grilling surface and leave the grill cover open - you need to see what is going on. Carefully, rotate the potatoes to make sure that the sides don't burn but start to get lightly charred. When all sides have been directly exposed to the heat, remove the potatoes from the grilling surface and place them on the upper warming rack to finish cooking.

Once on the warming rack, you can close the grill or continue grilling other items with the grill open. The heat will continue to cook the potatoes. Because of their size they will cook relatively fast. The potatoes are done when they are knife soft. The skin should be crisp and a tad smoky with soft inside.

Remove from the heat, place in a bowl. Immediately top the potatoes with a generous sprinkle of a nice course finishing salt.

Locally, Trader Joe's sells the Hawaiian pink and I believe they still have the black lava sea salt which I highly recommend. I have also noticed that the larger grocers are carrying similar products in the spice aisle - such as course gray sea salt.

Saturday, June 13, 2009

Pine Nut, Mint and Snow Pea Sauté

Noticed the arrival of snow peas this week. While the poor snow pea is often relegated to generic stir fry's along with water chestnuts and bamboo, this recipe celebrates our little snow pea as the main act!

This is a quick sauté with minimal ingredients and maximum punch. I particularly like the recipe at this time of the year since we can leverage other ingredients that are also coming with the CSA.

Key to this recipe is to cook the snow peas to the point that they still have snap. Over cooked snow peas are just not fun.

The recipe is intended as a side and will yield about three servings. The recipe scales if you want to make greater serving amounts.

Ingredients:

1/2 pound snow peas, rinsed, dried, tips of the ends cut off, strings removed
10 large mint leaves, chopped
1 clove garlic, minced
1/4 cup pine nuts
2 tbsp olive oil
1/4 teaspoon sesame oil

Process:

1) In a large sauté pan, heat oil on med-high heat
2) Add garlic, pine nuts and snow peas and sauté until done ( 1 to 2 mins). Snow peas should still have a snap to them.
3) Remove from heat and stir in mint and sesame oil
4) Serve immediately

Friday, June 12, 2009

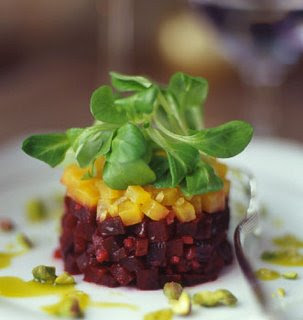
Salad of Pistachios, Beet and Goat Cheese

Here is an old recipe from Gourmet Magazine that is offered verbatim.

I would say that this is not your every day recipe. But if you are looking to impress folks with a unique salad for a nice sit down meal... this is it.

The recipe calls for some lesser common ingredients such as Mache and Pistachio oil. You should be able to find both at your larger grocers or a gourmet grocer (Whole Foods or Trader Joes).

I do not recommend skipping any ingredients or the plating process. It is all meant to come together to create a real "WOW" for your guests.


Ingredients:

3 large red beets
2 large golden beets
1/4 cup minced shallot
2 tablespoons fresh lemon juice
3/4 teaspoon salt
1/4 teaspoon black pepper
1/4 cup pistachio oil
4 ounces soft mild goat cheese
3 tablespoons salted shelled pistachios (not dyed red), coarsely chopped
1 ounce mache (also called lamb's lettuce), trimmed

Process:

1. Preheat oven to 425 degrees F.

2. Separately wrap red and golden beets tightly in double layers of foil and roast in middle of oven until tender, 1 to 1 1/2 hours. Unwrap beets.

3. While beets are cooling slightly, whisk together shallot, lemon juice, salt, and pepper in a small bowl, then add oil in a stream, whisking.

4. When beets are cool enough to handle, slip off and discard skins. Separately cut red and golden beets into 1/4-inch dice and put in separate bowls. Add 2 1/2 tablespoons dressing to each bowl and toss to coat.

5. Place cookie cutter in center of 1 of 8 salad plates. Put one eighth of red beets in cutter and pack down with your fingertips. Crumble 2 teaspoons goat cheese on top, then one eighth of golden beets, packing them down. Gently lift cutter up and away from stack. Make 7 more servings in same manner. Drizzle each plate with 1 teaspoon dressing and scatter with some pistachios.

6. Toss mache with just enough remaining dressing to coat and gently mound on top of beets. Serve immediately.

Yield: 8 servings

Thursday, June 11, 2009

Snow Peas in a Simple Orange Sauce


I would not have immediately connected the tastes of snow peas and orange until I tasted it. But the sweetness of the orange compliments very nicely the slightly sautéed snow peas.

This is another simple sauté that the kiddies should like and is made with common household ingredients. Key again is to not overcook the snow peas.

Ingredients:

3 cups snow peas
2 tbsp orange juice
1 tsp olive oil
1 tsp finely chopped garlic
Grated zest of 1 orange
Salt & freshly ground pepper to taste

Process:

1) Zest the orange and set aside

2) Juice 2 tbsp of juice from the orange and set aside

3) In a medium skillet, heat oil

4) Add garlic and orange zest and cook until golden in color (30 seconds)

5) Add the snow peas and orange juice

6) Cook covered until the snow peas are snap tender ( 2 to 3 mins)

7) Cook uncovered for an additional minute until the juices start to thicken

8) Add salt and pepper to taste and serve

Crunchy Almond and Snow Pea Sauté

Here is a fun play on the classic Green Beans Almondine. Instead of your generic French green bean, the recipe calls for snow peas. A subtitle twist.

Either way, the crunchy of the almonds and the crunch of the snow peas (if cooked correctly) are a beautiful compliment.

This is a fun recipe to get the kids to help with cleaning the ends off the snow peas. And the kiddies should like the end result.

Also, the recipe calls for shallot. While I do hesitate to say this, in pinch fresh garlic will do. But nothing can replace the flavor of the shallot.

Ingredients:

1 pound snow peas, trimmed
1/2 cup sliced almonds
2 tbsp unsalted butter
4 tsp minced shallot
2 tsp fresh lemon juice


Process:

1) In a medium sauté pan or skillet, melt the butter. Careful not to burn butter (will happen if heat is too high)

2) Add in the almonds and cook until fragrant and golden in color (about 60 to 90 seconds) - the butter will now begin to brown. Stir frequently to assure no burning.

3) Add the snow peas and shallots and cook until snow peas are tender crisp (about 1 to 2 mins)

4) Remove from heat, season with salt and pepper to taste

5) Place sautéed vegetables in a serving dish.

6) Dash fresh lemon juice over sauté and serve immediately.

Quicker Pickled Beets

While I do love the vinegar flavor that comes with most pickled items, I tend to think that the sweet flavor of the beets gets lost with traditional pickling.

This is a recipe that downplays the vinegar to bring out the natural sweetness of the beets. In fact, it's more a marinade than a pickling.

This is a quick simple recipe that requires little effort - basically boil beets, slice them, marinade and let the whole thing rest. It's a great addition to any lighter summertime meal.

Ingredients:

1 bunch of beets (4 to 6)
1/4 cup cider vinegar
1 tbsp sugar
1 tbsp olive oil
1/2 tsp dry mustard
Salt (sea or kosher) and pepper (fresh ground)

Process:

1) Remove beet greens and cut beets into uniform cuts

2) Boil beets until done (about 30 mins) - fork soft

3) Place the beets in cold water and proceed to peel off the skins with your fingers. The skins should release very easily

4) Cut the beets into slices and set aside

5) Combine all the other ingredients in a small bowl and whisk until emulsified - adjust to taste

6) Combine the beets and the marinade in a bowl and allow to rest at room temperature for 30 minutes.

Wednesday, June 10, 2009

Coconut-Lime Chicken and Snow Pea Salad


This is another oldie from my recipe collection. Categorized under Island Style for its tropical overtones.

The original recipe I believe came from Eating Well Magazine (which I highly recommend). The recipe yields two servings but easily scales.

Also, you can make the salad dressing up to two days in advance if you want to save time.

Double the flavor... half the work—simply by using the same tangy combination of coconut milk, lime juice and brown sugar for both poaching the chicken and dressing the salad. Crisp romaine lettuce, cabbage and snow peas add freshness and an irresistible crunch.

Ingredients:

1 cup “lite” coconut milk
1/4 cup lime juice
2 tablespoons brown sugar
1/2 teaspoon salt
8 ounces chicken tenders
4 cups shredded romaine lettuce
1 cup shredded red cabbage
1 cup sliced snow peas
3 tablespoons minced fresh cilantro
2 tablespoons minced red onion

Process:

1. Preheat oven to 400°F

2 . Whisk coconut milk, lime juice, sugar and salt in an 8-by-8-inch glass baking dish. Transfer 1/4 cup of the dressing to a large bowl; set aside. Place chicken in the baking dish; bake until cooked through, about 20 minutes

3. Meanwhile, add lettuce, cabbage, snow peas, cilantro and onion to the large bowl with the dressing; toss to coat. Divide between 2 plates

4. Transfer the chicken to a cutting board and thinly slice. Arrange the chicken slices on top of the salads. Drizzle 1 tablespoon of the coconut cooking liquid over each of the salads

Beet Chips

Ok..Ok... I know I am breaking my always healthy all the time rule. So let's just agree that this is a once a year thing!

So let's face it, the beet is just about the same in construction as a potato - a distant cousin! Therefore it does lend itself very nicely to begin made into chips. In fact, given the bland nature of the generic potato, beets really step up in the "chip department" with their sweet complex flavor.

Since I am willing to bet that most of the kiddies (and some adults) will fight you on tasting a braised or roasted beets, the introduction of a beet chip might just be a way to introduce the idea of eating beets.

Now, I do realize that it is much easier to just go down the junk food aisle of the grocery store and pay an unreasonable amount money for a bag of "gourmet" chips that includes beets.

But...come on... how often do you get to make homemade chips - let alone beet chips. In fact why stop with beets - maybe some sweet potatoes, carrots, etc...

The key to making good chips comes down to three key things:

1) paper thin slices - use a mandolin or other slicing device and be careful - use the hand guard
2) maintaining a steady oil temperature of 350 degrees - use a high heat frying thermometer
3) working in small batches to allow the chips to take form

From a storage perspective, the chips can be made up to 12 hours in advance and stored at room temperature uncovered. If you are planning on making in advance, warning - you must resist the urge to eat the whole bowl!

Ingredients:

3/4 pound beets
1/4 cup cornstarch
4 cups safflower or vegetable oil for deep-frying

Process:

1) Remove the green tops and peel the beets

2) Slice into paper thing cuts with a mandolin or other manual slicing device

3) Transfer beets to large bowl and toss to coat with cornstarch

4) In a large saucepan or pot, bring oil to 350 degrees

5) Working in small batches (8 to 12 slices), add beets to the oil and cook until
they begin to crisp and shrivel (about 30 to 60 seconds). Turn once in cooking process.

6) Immediately remove and place on paper towel to drain. Add salt to taste while still hot.

7) Repeat process until all are cooked.

Tuesday, June 9, 2009

Message From the Farm:

We are throwing away huge amounts of produce due to damage from the weather – the chickens & animals are eating very well – unfortunately the stuff is not even fit to send to the local soup kitchen.

Weather, labor & readiness of product all determine what & when we will pick, i.e.
– if it is raining, no beans but maybe potatoes
– no labor = no onions (they take a lot of work picking & cleaning) but maybe zucchini

Monday, June 8, 2009

CSA- Share Details: Week #5

Here's what to expect tonight...

BEETS, SNOW PEAS OR MAYBE SNAP OR HULL PEA , SALAD GARLIC SCAPES, HERB, COLLARDS OR KALE, STRAWBERRIES

From the Farmer, "THESE ADVERSE WEATHER CONDITIONS ARE REALLY MAKING A CHALLENGE – WE COULD NOT PICK AS WE HAD STANDING WATER IN THE FIELDS -& EVERYTHING WAS WET."


[asparagus, garlic scapes, snow peas, strawberries, parsely, beets, red leaf lettuce, salad mix, spring onions]

Thursday, June 4, 2009

Recipe Update

OK- Chef Mike is out of town this week, so we apologize for the delay in recipes and answers to food questions. However, I'm going to take a crack at the question that came in to CSA Share recap: Week #4 , since it leans more toward the side of science.

From CSA member Jess E:
"Chef Mike, what type of onions are those green onions?..."
Are they spring onions, green onions, or scallions?

Answer:
Believe it or not...We are talking about the same veggie at different stages of maturity. These are all young shoots of bulb onions.

Scallions are the youngest or least mature of onions with very thin white bases no wider than their long, straight green stalks.

Green onions have long, green, delicate stalks and small, very slender, white bulbs. The bulb of a green onion is slightly defined.

Spring onions have slightly rounded bulbs that are more defined and just a bit larger than the more slender green onions. Spring onions are the most pungent tasting of young onions with a bit more bite than green onions.

I would say that this week we are eating spring onions. Chef Mike will give you some more eating tips soon, but in the meantime,
THE ENTIRE ONION IS EDIBLE!!

Beet Greens

YES...you can eat beet greens.


**Remove from root, wash, and cut off coarse stems. Use as you would any of the coarse greens we've been getting.


Quick fix: Tear the beet greens into pieces and stir fry in olive oil with garlic and onion. A little salt & pepper to finish. Lately, I've liked a bit of acid in my greens- either a splash of lemon juice or even red-wine vinegar.


Roasted Beets


TIP: Remember, it's easiest to peel your beets after you roast them. Cool just until they can be handled, then rub with a paper towel to remove skins.

Tuesday, June 2, 2009

CSA Share recap: Week #4

This week we have: Strawberries, rhubarb, beets, spring onions, mushrooms, kale, spinach, mint


Strawberries were a nice surprise this week. It must be summer!


Very much want to continue to thank former and upcoming volunteers. In the never ending quest to streamline our CSA, please begin to send any dates you know in advance that you will NOT be picking up your share. No worries...Manna Food Bank is thrilled to get these donations. However, in consideration of our volunteers' time, it would be helpful to know that they don't have to wait for shares that are not being picked-up.

CSA Food Project - A Experiment in Sustainable Eating   © 2008. Template Recipes by Emporium Digital

TOP  

/* ************ Google Analytics ************ */